Scenario
How to convert a string or a string array into a double array?
The .NET does not provide any method for us to call directly. However this is easy to implement within just a couple lines of code.
Method
//str is the input string that contains a sequence of numbers
string[] arrString = str.Split(new char[] { ' ' });//you can define your own way to split the string
double[] arrDouble = new double[arrString.Length];
for (int i = 0; i < arrString.Length; i++)
{
arrDouble[i] = double.Parse(arrString[i]);
}
Tuesday, April 28, 2009
C# Cross-Thread Operations
Cross-Thread Operations
Many of you may have seen the cross-thread exception when dealing with Cross-Thread operations. For example, if you try to call a Form function from a separate thread, you will get an error message similar to:
Cross-thread operation not valid: Control 'Form1' accessed from a thread other than the thread it was created on.
That is, you cannot manA Cross-Thread operation in C# is a call that accesses components from a different thread. Handling corss-thread is a requirement starting with .NET Framework 2.0. We are going to discuss how to make cross-thread calls between controls.
Delegates
The answer is simply to use delegates to invoke methods that use cross-thread operations. Using delegates is an elegant way to call methods that are from other threads.
Methods
The example is quite simple. Let's create a blank winForm application. Then create a second thread called secondThread. Within the secondThread, we try to change the text of 'Form1'. The above exception message will pop up if the following stuff is not implemented.
InvokeRequired
The key for cross-thread calls is in the InvokeRequired property. When cross-threading will be required, the property will be true. This is a way to let you know wether you are in a cross-thread issue or not. You can then use delegates to invoke the method properly:
if (this.InvokeRequired)
{
DoSthDelegate aDelegate = new DoSthDelegate(DoSth); //delegate
  this.Invoke(aDelegate); //call the method
}
else
{
  //Your code here
}
Others
For more about delegates, refer to http://msdn.microsoft.com/en-us/library/ms173171(VS.80).aspx
For more about Invoke method, refer to http://msdn.microsoft.com/en-us/library/zyzhdc6b.aspx
Tuesday, April 21, 2009
MCTS for C# Developers
 Microsoft Certified Technology Specialist (MCTS)
The Microsoft Certified Technology Specialist (MCTS) certifications enable professionals to target specific technologies and to distinguish themselves by demonstrating in-depth knowledge and expertise in their specialized technologies. An MCTS is consistently capable of implementing, building, troubleshooting, and debugging a particular Microsoft technology.
 The following three exams are the most common three people take before reaching the top of the above pyramid. After passing the each one of them, you will be able to create your own Microsoft Certification Logo. E.g.
_512.png)
You can go to the MCP website and order your own MCTS certification. It should be mailed to you within 1 ~ 2 months. Here is a sample certification you will get. Obviously, "YOUR NAME" means your real name will be placed there.

Exam 70-536
Microsoft .NET Framework - Application Development Foundation more
Training Kit download link
Exam 70-526
Microsoft .NET Framework 2.0 – Windows-Based Client Development more
Training Kit download link
Exam 70-528
Microsoft .NET Framework 2.0 - Web-Based Client Development more
Training Kit download link
Thursday, April 16, 2009
Simple Messenger - A C# MSN Messenger-like Chat Application
Download sample application here
 Collapse Collapse Collapse Collapse Collapse
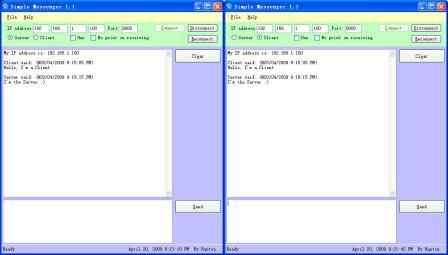 Collapse Collapse Collapse Collapse

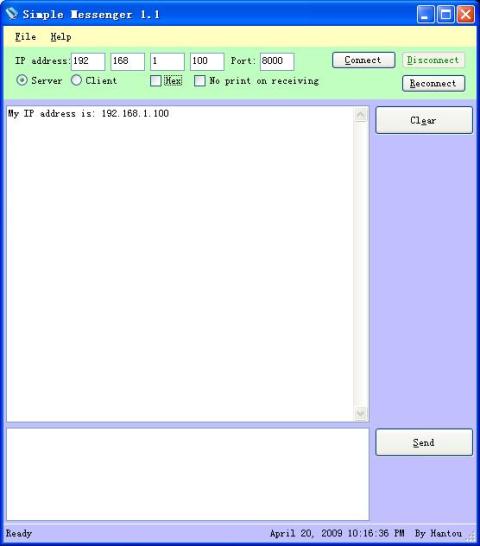
Introduction
This is a simple MSN Messenger like chat application using socket programming. It allows the users to send and receive messages by running two Simple Messengers.
You can read this article from my blog: http://hantou.blogspot.com/.
There are two specific features other than the regular MSN Messenger:
- '
Hex' - TRUE: The data will be displayed in Hex format.
- FALSE: The data will be displayed in regular text.
- '
No print on receiving' - TRUE: The received data will not be printed on the textbox.
- FALSE: The received data will be printed on the textbox.
Background
One day when I was working on socket programming, I needed to monitor data transmission. Although Visual Studio already has a debugger for the user to monitor the data, I still needed a third application to cache the data and take a look at it. This comes with the idea for the Simple Messenger. You can use this program as a chat application when you run two simple Messengers. If you connect your computer to a device, another software, a web application, etc., you will be able to send/receive data via one Simple Messenger application. In my case, I just connect my computer to a device which has Ethernet connection and I need to monitor the data sent by the device during the run time. The main purpose of this article here is to share this program with you regarding socket programming and multiple threads.
KeyValuePair
A helper class wraps a Socket and a byte array.
public class KeyValuePair
{
public Socket socket;
public byte[] dataBuffer = new byte[1];
}
Overview
There are two main classes named Server.cs and Client.cs standing for Server mode and Client mode respectively. Note, the scenario is that only one server and one client are connected. This means that if you try to open one server and multiple clients then I cannot promise anything. The one-to-many case is not implemented and this is beyond the main issue that is being discussed here.
Connection
The connection is slightly different between the Server Mode and the Client Mode.
First look at the Server Mode:
public void Connect(string ipAddr, string port)
{
server = new Socket(AddressFamily.InterNetwork, SocketType.Stream, ProtocolType.Tcp);
IPEndPoint ipLocal = new IPEndPoint(IPAddress.Any, Convert.ToInt32(port));
server.Bind(ipLocal);//bind to the local IP Address...
server.Listen(5);//start listening...

// create the call back for any client connections...
server.BeginAccept(new AsyncCallback(OnClientConnect), null);
}
The server needs to watch for the connection to see if there is any client trying to connect to it.
public void OnClientConnect(IAsyncResult asyn)
{
try
{
if (server != null)
{
   tempSocket = server.EndAccept(asyn);
   WaitForData(tempSocket);
   server.BeginAccept(new AsyncCallback(OnClientConnect), null);
}
}
/* ... */
}
Before the server socket receives any data, we must prepare for it ahead. Here the KeyValuePair object is imported as a parameter.
public void WaitForData(Socket soc)
{
try
{
if (asyncCallBack == null)
   asyncCallBack = new AsyncCallback(OnDataReceived);

KeyValuePair aKeyValuePair = new KeyValuePair();
aKeyValuePair.socket = soc;

// now start to listen for incoming data...
aKeyValuePair.dataBuffer = new byte[soc.ReceiveBufferSize];
soc.BeginReceive(aKeyValuePair.dataBuffer, 0, aKeyValuePair.dataBuffer.Length,
            SocketFlags.None, asyncCallBack, aKeyValuePair);
}
/* ... */
}
Now look at the Client Mode:
public void Connect(string ipAddr, string port)
{
client = new Socket(AddressFamily.InterNetwork, SocketType.Stream, ProtocolType.Tcp);
IPEndPoint ipe = new IPEndPoint(IPAddress.Parse(ipAddr), Convert.ToInt32(port));
client.Connect(ipe);

clientListener = new Thread(OnDataReceived);
isEndClientListener = false;
clientListener.Start();
}
Data Receive
Since the AsyncCallback is used for the server, receiving the data will be different.
For the Server Mode
KeyValuePair aKeyValuePair = (KeyValuePair)asyn.AsyncState;
//end receive...
int iRx = 0;
iRx = aKeyValuePair.socket.EndReceive(asyn);
if (iRx != 0)
{
byte[] recv = aKeyValuePair.dataBuffer;
}
For the Client Mode
byte[] recv = new byte[client.ReceiveBufferSize];  //you can define your own size
int iRx = client.Receive(recv );
if (iRx != 0)
{
//recv should contain the received data.
}
Data Send
Sending the data is as easy as calling the Send() method that comes with the Socket. E.g.
soc.Send(dataBytes);//'soc' could either be the server or the client Error Handling
In Server's receive block, you might want to handle the SocketException with ErrorCode == 10054. This error code indicates the connection reset for peers. Refer to MSDN.
if (e.ErrorCode == 10054)//Connection reset,
// http://msdn.microsoft.com/en-us/library/ms740668(VS.85).aspx
{
/* ... */
}
Points of Interest
Every time I used the MSN Messenger to chat with my friends, I was worried if my conversation would be recorded by 'MSN'. Now I'm happy and 'safe' to use my own chat application to chat with my friends, er... within a local network. However, the main benefit of this program is that I learned how to play with the Ethernet and sockets. I hope this will benefit you as well.
For more information about me, please visit my blog: hantou.blogspot.com.
History
- 2nd July, 2008 - First version
- 16th April, 2009 - Updated article downloads and images
- 20th April, 2009 - Updated article
Wednesday, April 15, 2009
Requirement Analysis

I found this interesting picture picture yesterday and strongly feel that it exactly describe what I'm working on everyday! We all have stress from work, family, friends, etc. This funny cartoon is a way to relax myself just because someone has point out what I'm thinking daily.
I actually found this cartoon from an IT forum. I search the picture on the Google and find that it has a full version of the 'Requirements Analysis' story. Here is the link for you interest: The Project Cartoon. There are up to 18 cell-pictures you can choose and make your own cartoon.
Requirements analysis in systems engineering and software engineering, encompasses those tasks that go into determining the needs or conditions to meet for a new or altered product, taking account of the possibly conflicting requirements of the various stakeholders, such as beneficiaries or users. -- Wiki
Sunday, April 12, 2009
8 Ways to Optimize Your C# Application 2/2
Ways to optimize C# code in .NET development
5. "try catch" vs "if else"
The "try catch" block is used to catch exceptions that are beyond our controls, such as connection problem. The "if else" is one of the basic logic which is being used in both programming and reality. The "try catch" block helps to avoid error-prone calls or any errors that might slow down the application. According to the 'KISS' principle, using "try catch" to keep code "simple", "clean" better than using "if else" statements. However, we should refactor our source code to require less "try catch" or "if else" statements. That should be the main concentrate of code optimization.
6. Replace divisions
Although this issue is not as common as above, you could benifit from it if you are playing with numeric operations such as multiplication, division. The C# language is relatively slow when it comes to division operations. There is an article written by "rob tillaart" from CodeProject: http://www.codeproject.com/KB/cs/FindMulShift.aspx. He introduces an alternative way called "Multiply Shift" in C# to optimize the performance.
7. Using sealed classes when there isn't any derived class
The sealed modifier is primarily used to prevent unintended derivation, but it also enables certain run-time optimizations. In particular, because a sealed class is known to never have any derived classes, it is possible to transform virtual function member invocations on sealed class instances into non-virtual invocations. -- From "gicio" in 'Performance Optimization in C#'
8. 'for' Loop vs. 'foreach' Loop
Again, this is from "gicio" in 'Performance Optimization in C#'.
This code costs tooooo much:
foreach(DataRow currentDataRow in currentDataTable.Rows)
{
newDataTable.ImportRow(currentDataRow);
}
this code runs over 300 % faster (depends on rows count):
DataRow[] allRows = currentDataTable.Select();
foreach (DataRow currentDataRow in allRows)
{
newDataTable.ImportRow(currentDataRow);
}
Conclusion
As you can see these are very simple C# code optimizations and yet they can have a powerful impact on the performance of your application. If you know any other useful C# code optimization ideas, please let me know and I will add them to the list here.
Thursday, April 9, 2009
8 Ways to Optimize Your C# Application 1/2
Ways to optimize C# code in .NET developmentStuck with your code? Need higher code performance?Code optimization is an important aspect of writing an efficient C# application for your .NET development. The following 8 tips will help you increase the efficiency of your C# applications.
1. StringBuilder: knowing when to use
The main difference between string and StringBuilder is that using the StringBuilder to modify a string without creating a new object can boost performance when concatenating many strings in a loop. If you have a loop that will make modification to a single string for many iterations, then a StringBuilder class is much faster than a string type. However, if you just want to append/insert something to a string, then a StringBuilder will be over power. In this case, a simple string type will work well.
2. Strings Compare: Non-Case Sensitive
When we compare two strings, usually we use the built-in equals() method for the comparison. In case of ignoring the cases, people use ToLower() or ToUpper() methods. However, ToLower() or ToUpper() are bottlenecks in performance. Here is a way to increase your applications: use string.Compare(str1, str2, true) == 0; for comparing two strings ignoring cases. If str1 and str2 are equal ignoring cases then result will return 0.
3. Strings Compare: "string.Empty "
It is normal to see people use .equals("") for comparing an empty string. A popular practice is that checking a string's length to be 0 is faster than comparing it to an empty string. Using string.Empty will not make anysignificant performance improvement, but bringing you the readable optimization.
4. Using "List<>" instead of using "ArrayList"
Both List<> and ArrayList can store objects within the same list. The difference is that ArrayList can store multiple types of objects while List<> has to specify one type of object. Also, when you extract the object from the list, the List<> does not need to cast the variable to a proper type while ArrayList has to. Therefore, if
you are keeping the same type of variables in one ArrayList, you can gain a performance boost by using List<> instead.
(to be continue...)
8 Ways to Optimize Your C# Application 2/2
Tuesday, April 7, 2009
Add a property to user control
The .NET Framework has extensive support for programmers to create custom user controls. When you create a user control, also known as custom control, you can add a custom property to the property page that allow the user to modify the properties you created. Let's take a look at how to achieve this goal step-by-step:
Known issues:
Assume that we create a winform project and a user control which contains a button only. This user control is called "MyUserButton.cs". We want to add a custom property called "TreeView" that should appear on the "Properties" panel.
Detail:
1. In the Solution Explorer panel, right click on your user control "MyUserButton.cs" file and select "View Code".
2. In the class "MyUserButton.cs", create a private variable "treeView" with type "TreeView".
private TreeView treeView;
3. Then type the following code beneath the variable declarations from last step:
public TreeView MyTreeView
{
get { return treeView; }
set { treeView = value; }
}
4. Save the file and add the "MyUserButton" control to the main window. On the Properties grid panel we can find a property named "TreeView" that is what we just created.
Summary
There are some more advance features about adding a property to the user control. Here is just a simple example that giving you a brief idea on it. For more information, the article "How To Add a Custom Font Property to a User Control" is also useful.
Subscribe to:
Posts (Atom)